Posts Tagged ‘reprap’


BOX

On 3D printers, we start to have a wide variety of Hotends.

Here is a newcomer starting and Ullule cround founding campaign who’s goal is to manufacture it and make it available for everyone.


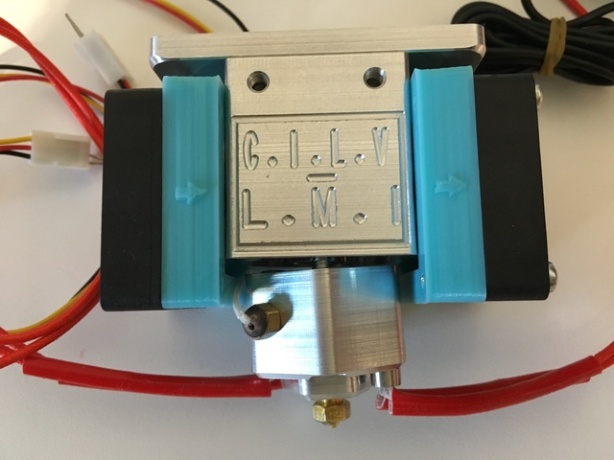
  • Made in France by Professional CNC machines
  • This hot end can be provided with a full set of Nozzles.
  • It’s compatible with both 1.75mm and 3mm filament
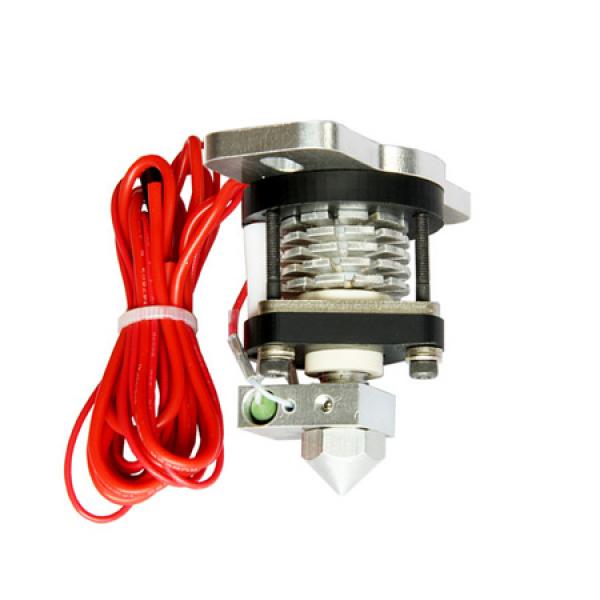
  • All the airflow goes through the huge heatsink

b82e234f016ff0adbe1d2e382b33e7

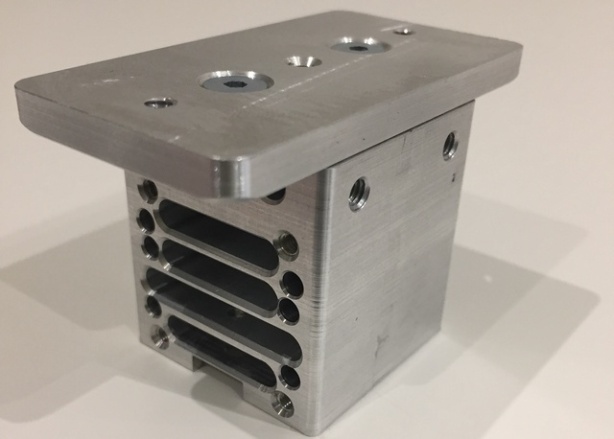
  • The Flat heatsink  and the 2 mounting holes greatly increases the steadiness of the hotend when mounted on the carriages.
  • It’s also provided with a mounting plate, so you can use it to attache an extruder on top of it, or you can use it to mount it on a horizontal carriage
  • Provided with a double cooling fan : 1 fan is blowing the air inside and the other fan is extracting the air. This allows the hot end to work on harder environment conditions that with standard E3D hotends

37bc7ba9adbfd45eb9f2ad219405ea

  • Provided with a digital thermometer that can be plugged inside the heatsink to watch if the hotend is operating on it’s working range. The temperature at the top of the heatsink is somehow linked to the temperature on the heatbreak side. So, monitoring the temperature at the top gives you an idea if the heatbreak temperature is inside normal working range. Above this point PLA filament might clog.

1590fd8e635aa03f472888ff97432a

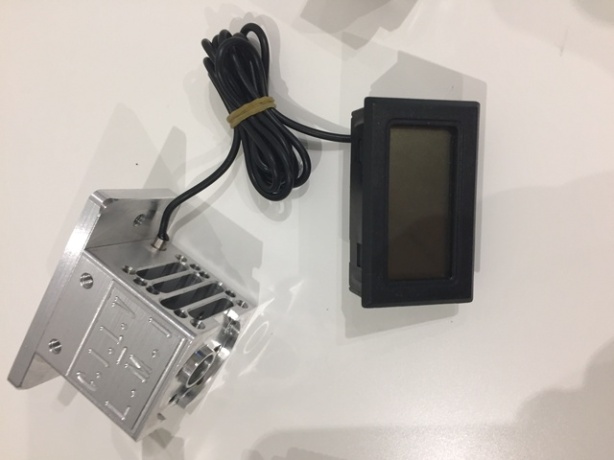
  • With air cooling alone, the hot end can work under around 30-35°C of ambient air.

When compared with other models of hotends, during summer, when the room temperature is reaching 27-28°C the full metal hot ends will easily clog with some PLA filament.

  • It has a HUGE heater block with Dual 40W heater cartridge!

The heater block is huge and can heat as fast as standard E3D hotends.

The side of the heating block allows the filament to better/faster melt when passing through the block.

The plastic deposit is smooth and the heating capacity of the block allows easily to use nozzles with very big diameters (1mm and more!)

It’s also very robust to any airflow.

Also the thermistor is screwed on the heater block

  • Large but reasonable height

  • A water cooling system can be installed easily

Here is a 3D view of the future Water cooling system compatible with the hotend.

Possible Future upgrades

This design also allows some flexibility for upgrades such as swappable nozzles

Positive points:

  • Dual heater cartridge  (2x40W) => great melting capacity at low temperature.
  • Dual Cooling fan => can print at high ambient temperature
  • Can be upgraded
  • Thermistor is screwed on the heater block
  • Supports standard nozzles with M6 thread
  • Professional CNC machined hot end
  • Full Metal
  • Provided with changeable heartbreaks to support both 3mm and 1.75mm filaments

Limitations:

  • The price can be expensive for some users
  • The size can be an issue for small 3D printers

For more details check the Ullule campaign here


 Let’s see what other hot end exists on the market for single extrusion hotends (non exhaustive list):
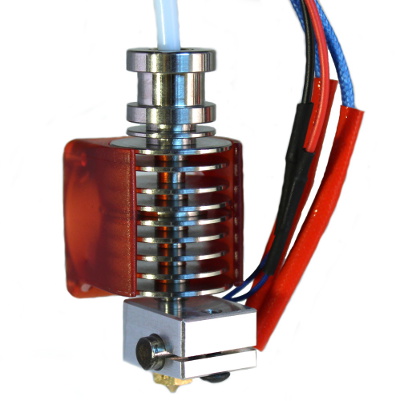
Chinese E3D Clones:

V6Clone

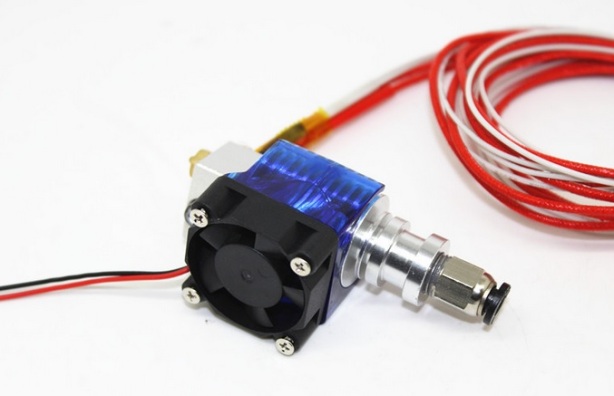
This model is a clone of E3DV6 hotend.

You can make the difference because

  • It’s sold on chinese market places (alibaba, ebay etc…)
  • It has a metallic pneumatic connector (the original one is embedded on the heatsink)
  • the heat block is still using a standard thermistor and a screw to hold it on the block
  • The thermistor is held with the heater cartridge by capton tape
  • The heater block is not compatible with the originals E3D silicone socks

01900134-220e3d20silikon-socken20fc3bcr20v620100-res-800x634

Positive points:

  • Cheap
  • Easy to find
  • Compatible with E3D mounting grooves
  • The heatsink has the injected fan holder which is often good quality.
  • Using standard nozzles with M6 thread
  • Provided with 40W heating cartridge (Original model is 30W)

Limitations:

  • Quality can vary from seller to seller
  • Not a full metal hot end: These are made to use a PTFE liner inside so don’t expect to go higher than 240°C with them!
  • I know a lot of people that struggled with these, so be aware of this


Buda style :

4016c7ac40235beaed8fa53ce909aea4-600

This model is bigger than the other kind of hotends

Positive points:

  • Has a mounting plate which seems steady
  • Can be provided with Heater cartridge (look for these model if you want one)
  • The heatbreak can be in Peek (so not a full metal hotend), so it might be easy to print PLA without clogging issues

Limitations:

  • Can be provided with power resistor instead of heater cartridge (these often don’t last long!)
  • The PEEK heatbreak is limiting the maximum temperature you can use with this hotend.

Original E3D Hotends series

Here you have multiple very popular hotend models

E3D Lite 6

lite6_400px

Positive points:

  • Cheap
  • Good quality  manufacture (made in UK)
  • Provided with Silicone Socks
  • Compatible with E3D mounting grooves
  • Very robust with any kind of PLA, clogging free!

Limitations:

  • Semi metal hot end, so max temp is 245°C, which is enough for most common materials PLA, ABS and PETG, LAYWOOD etc…
  • Limited to 1.75mm filaments


E3D V6
v6-3mm-sensor-block-cutout-socked-1000x1000

Positive points:

  • Very good hot end!
  • Full Metal (can reach 285°C as is and up to 400°C with a PT100 module)
  • Good quality  manufacture (made in UK)
  • Provided with Silicone Socks
  • Compatible with E3D mounting grooves
  • Uses standard nozzles with M6 thread
  • Can be upgraded
  • 2 models: 1.75 and 3mm

Limitations:

  • More expensive than E3D Lite and Chine clones

Hexagone AO:

hexagonao_800

Based on Hexagone Hotend, with bigger heater block

Positive points:

  • Big heater block
  • Full Metal
  • Good quality  manufacture
  • Provided with compact heater cartridge

Limitations:

  • Some PLA might clog easily if the heatsink is not properly cooled down
  • No dedicated fan mount provided, you have to make one yourself.

Dyze

Positive points:

  • Very compact
  • Full Metal
  • Titanium heatbreak
  • High quality nozzles
  • Can reach up to 500°C for very special materials
  • Professional grade
  • Water cooling compatible (a full set of water cooling upgrades are available)

Limitations:

  • Can be expansive for some small 3D printers users
  • Very small fan, can lead to some cooling issues if the hotend is placed in hot environment
  • Watch out what types of filaments you are using with this nozzles and properly clean up the nozzles after changing materials

The other hotends

I’m very sorry if i missed any other hotends but the goal of this article is not to list them all.

The main goal is to show you a few common hotends so that you can compare and make your own mind about the CILV3D hot end.


Runout.jpgI looked around to find a solution for my 3D printer to automatically detects when my spool is empty to avoid troublesome issues during long prints.

After a few time i found this module that seemed to do the job.

(http://3dmodularsystems.com/en/upgrades/275-runout-sensor-module-for-reprap-3d-printers.html )


Quick description

Description.jpg

By itself, the sensor is only able to detect when the filament on your spool is running out.

On the other hand The marlin firmware is handling all the logic behind what the 3D printer is doing when the filament is running out.

The magic of this kind of system

At first i was just looking at detecting the end of my filaments. But after reading a little further i noticed that this kind of sensor could also allow me to do much more such as:

  • Re-use my leftover filament (often around 1 or 2 meters) and still be able to print big objects with them.

For example, if my print requires 10 meters of filament, and i have a few left over filament, i can start my print with 2 meters of filament, then the printer will detect the end of it and will allow me to use another left over filament… this until my print is complete!

  • I don’t need to buy a 2 or 10KG spool of filament to do Huge objects! I can simply use standard 1Kg spools for these Huge prints!
  • The description says that it’s kind of Universal sensor, as it is compatible with both 1.75mm filament and 3mm filaments
  • It seems very easy to install on Ramps based boards
  • You can change filament color during the print! by just triggering the change filament command! (M600 or from LCD menu)

Requirements

This modules Requires that your firmware supports “Runout” filament feature.

This is kind of new features for some firmware, so you may need to upgrade it to a recent version in order to be able to use it.

Marlin Firmware RC8 and above seems to be supporting these already!

Unpacking the sensor

I bought this module from 3D Modular Systems website for about 10€.

IMG_9451

The sensor is provided in a 3D printed box (white in my case), all wired up with 2 additional black connectors.

IMG_9452

The sensor connector is a 3 Pins black connector similar to those used with stepper motors or servo motors

IMG_9449

The 3 pins connector has only the 2 opposite pins wired up. The middle pin is left over.

Wiring the sensor on Ramps 1.4 Board

Here is a screenshot of the provided instruction for wiring this sensor:

Wiring

It seems a bit strange at first as it’s connected on the last column of the Servo dedicated pins block.

The middle pin on the connector is left over as it’s not using the +5V provided by the middle pin.

Checking the sensor compatibility with 1.75 and 3mm filament.

I also tested that both 1.75mm and 3mm filament were compatible with this sensor.

I push though the sensor a left over of 1.75mm filament and i could hear a small “click” sound. Which i suppose is a good sign.

IMG_9454

I then tested another left over of 3mm filament

IMG_9455

Here again a nice “clicking sound” could be heard once the filament passed through it.

The sensor installed on my printer

I then installed it on my Makerfarm 8″Prusa i3 3D printer simply by passing the filament through the sensor hole with the arrow.

IMG_9456

I think it can fit any kind of extruder, bowden or direct as this sensor can be installed on nearly all extruder.

The wire length is about 70 Cm which is also a reasonable length for standard 20x20x20 and 30x30x30 3D printers on the market.

More closely the sensor looks like this

IMG_9457

Firmware changes

Firmware changes on Marlin RC8 are explained at the bottom of the product description on the sensor page (http://3dmodularsystems.com/en/upgrades/275-runout-sensor-module-for-reprap-3d-printers.html)

But here is a screen shot for the sake of the explanation

Marlin

What Happens when the filament is running out?

It’s very surprising at first as we are not used to it but here is what happens in details

  1. 3D printer stops printing, the nozzle is lifted up and parked on the corner of the build platform.
  2. The filament is extracted (the amount of extracted filament can be configured on the firmware side)
  3. A periodic beeping sound is triggered and a message on the LCD screen is displayed asking you to change the filament and to press the button to extrude filament back into the hotend
  4. Then you need to pull out what remains of the filament and change it with some other. Just start to push it into your extruder and then just press the LCD knob button.
  5. The Extruder is then extruding the filament into the hotend.
  6. If the filament is not fully going into the hotend, you can still push the knob button to push some more.
  7. Once the filament is starting to drip from the nozzle of the hot end, you can press the knob button to resume printing (check the menu on the LCD screen)
  8. The printer resumes printing where it stopped!

Conclusion

In the end, when you start to feel the possibilities of such a sensor on your printer you just cannot print without it!

  1. It secures your print from possible breaking filament
  2. It secures your print from not having enough filament on your spool to finish your prints!
  3. You can print very huge objects that requires more than 1 filament spool of any size and weight
  4. Your filament left over now have great values! as you can still print objects with them, and you don’t have to wait for someone to recycle them for you in a “near” or “far” future!
  5. You can change color while printing, thanks to the firmware “change filament” feature

In term of scalability, a reprap 3D printer in theory is scalable.

However, when you look deeply here is what you may experience:

  • It’s a pain to figure out how to do
  • You will need to change/redesign some plastic parts
  • Some mechanical parts will not be appropriate
  • You will need to tweak a little bit some settings
  • You might experience some issues that you never saw with your previous setup

On this 3D modular systems has a solution:

  • Each models of their printer family can be upgraded or downgraded to the other model
  • They can provide a simple upgrade or downgrade kit for each model
  • You keep most of your printer’s parts and only add what is needed
  • Their chassis is based on 30x30mm extrusion profiles which makes it easy to scale and plug anything you want on it (camera support, light support,  new spool holder, etc…)

Here is their kickstarter campaign promotion video:

Why to upgrade/Downgrade a 3D printer?

  1. You might want to print bigger plastic parts! in that case you need to increase the overall build platform. This one is obvious.
  2. You might want to reduce the size of the printer because you are moving with your girlfriend or a smaller flat/house (who knows!), in that case you may want to reduce the overall size of the printer. In this matter i found very few 3D printers company with this kind of solution.

In both cases other 3D printers solutions will propose you to buy a bigger/smaller printer.

Printers Features/Specifications:

Here is what they propose in term of features:

When you look deeply here are the cool things they provide:

  • A clear technical specification
  • A built in smoke detector (i never saw one on a printer), so far not much information about this, i hope they will provide very soon.
  • By default LCD and SD card support (Many of the 3D printer kits provide this as an expansive option.)
  • A 700W 220V silicon heat-bed for the XL model, wich is nice
  • A strong 30x30mm aluminum extrusion based chassis, that is far stronger than the standard “frame” type prusa i3.
  • A built-in aluminum heatbed, it’s very nice to evenly spread the heat all over the bed platform.
  • Standard electronic components Arduino mega + ramps 1.4): this is very nice because it’s cheap to maintain
  • They provide a nice Box with both electronics and LCD display on the same box with a 80mm fan inside.
  • The power supply is an industrial grade 220/110V, with a safety fuse included into the power plug.
  • The power supply has a nice digital voltmeter, very nice to see if there are any power anomalies.
  • Built-in inductive probe for auto leveling (on this one it’s becoming a standard!)
  • The XL model has a big print surface (about 400×300), twice as big as a large PCB heatbed (300×200).
  • The M model print surface is as big as a big PCB heatbed (300×200).

Conclusion:

In conclusion, i would say that if you want to buy a 3D printer kit or make one yourself, this design will certainly keep your attention.

There seems to be a very small amount of parts ,the components are easy to find (except maybe for good quality and cheap) smooth rods.

Also the design seems very strong and robust, and i believe this is the kind of printer you can handle/move without any issues with the mechanics.

They also have a thingiverse thing with nice pictures for now, and a 3D model of their Scalar M printer .

The plastic parts should come very soon i hope.

Here is the link:

http://www.thingiverse.com/thing:891409


You are the only one capable of answering that question.
Also, your current state of mind might make you go for a very small model because you want to test the technology, or you might want to go directly for the big ones, with in mind “the bigger the best” or “the big one can also do the job of the small one”.

To be honest, if you want to start with a big DIY printer make sure you have a certain experience in 3D printing.
You will experience for sure all the issues you will get with a small printer and you might experience them all at once!.
Make sure to focus on 1 issue at a time.
With big DIY 3D printers, each detail is very important. It can really becomes the butterfly effect, where you have 1 part of the printer causing another side to go crazy.

Also adjusting stepper motor power can be challenging, and might require you to spend a few hours playing with it.

Also if you are impatient to play with a 3D printer, consider the “out of the box” printers. You will avoid the frustration of having to fix all the problems before doing some good prints.

If in another end you want to save money and gain a great deal of experience with your 3D printer, go for the DIY kit!
First because you will known your printer as it’s part of you. You will be able to quickly diagnose and fix any possible issues that comes during the lifespan of your machine.
You will also be more able to increase the life span of your printer by evolving it on you own and taking the last advancement in 3D printing.
It will also save you a lot of money in maintenance, as you will fix yourself your printer.
It will also increase your creativity, as you will look for many solutions, and find a lot of different answers on the Internet or by your own. People are very creative when it comes to DIY, and we can very quickly learn from their ideas!


This question can rise after you get your first printer.
Often we go for a small or a standard 8″ printer.
After some prints you will be limited by the size of the parts you want to print.

So considering this question when you buy your first printer can be interesting in the long term use of your machine.

You might want to start small, but after some time you may want to go bigger.
In that case depending on the printer you have, you might be able to scale it to make it bigger, or you will need to buy another bigger printer!

Scalable printer can be found on Internet, or you can make your own.
Of course making our own 3D printer model often requires that you already have 1.

Scalable printer:

Scalable printers are often DIY kits.
On top of them you can create your own plastic parts to increase it’s capabilities, or tweak it for your own needs.
They are often cheap, and are using standard parts that you can find on your local hardware store.

Ready to use printers

Those printers are often more expansive than the DIY kits, but they are already mounted,and often semi-professional quality.

Go for those if your budget allows it and also if you feel more comfortable with this concept.
You will be able to print once out of the box, and this is a great aspect.
Often no, or a very small calibration is needed.

However if you need to make it bigger, sometimes you won’t be able to do it easily. So it’s kind of restrictive approach.


This questions mainly relies on the mechanical parts of the printer.
If you are using belt driven axes you will find this article answering the main aspect:

https://nutz95.wordpress.com/2014/12/02/reprap-how-to-choose-your-pulleys-for-your-3d-printer/

To make it quick, here is the conclusion for a 16 micro stepping setup on your stepper driver:
Teeth | Steps/mm | Resolution (microns) | Torque required (%)|Speed (%)
16 teeth | 100 steps/mm |10 microns| 100% | 100%
20 teeth | 80 steps/mm |12.5 microns| 125% | 120%
25 teeth | 64 steps/mm |15.625 microns| 156% | 136%

Use a calculator to get more specific details

If you want more details about a specific setup look for some reprap calculators such as :

It should fit 80/90% of your needs.

Resolution is only 1 aspect

Indeed you will quickly see that even a printer with a great resolution can make crappy prints.
You also need to find a proper chassis and find a good ration between speed/quality.
This is where you will have the most effect on the quality of a print.

Stepper micro stepping are to be taken into consideration

If you look at this article: you will find that the more micro step you setup, the less torque you will get from the couple motor/driver.

If you need to drive a heavy heat bed, you might consider reducing a little bit the micro steps on this axis to avoid or reduce magnetic backlash.


What hot end to choose

About hot ends you will find at least 3 types of hot ends:

  • Plastic
  • Semi-metal
  • Full-Metal

Plastic


The most commonly known is the JHEAD. (see the photo).
It comes with different version (MKI-> MK 8) see wiki for more details()
The main body is in PEEK plastic that support a maximum of 248°C.
So you will still be able to use PLA and ABS with those hot ends.
Also they are very cheap, so it can be a good idea to start with those cheap hot ends.
You can find some standard and some bowden version of this hot end, and different nozzle size can be available.

Semi Metal

The semi metal hot end has the appearance of a full metal hot end but has a liner inside the nozzle to avoid the PLA plastic to expand when cooling down.
The well known AluHotEnd from 3D-Industries is a good example.

http://3d-industries.myshopify.com/collections/hotends/products/aluhotendv6

The price here is a little bit more expansive but you have aluminum parts + a PTFE liner in the nozzle.
The maximum temperature is about 245°C and you can print PLA and ABS with it.
It’s also a good choice for the beginning as it’s very easy to use.
Notice however that the slim metal barrier part is very fragile and this is often the part that breaks first when holding by hand the hot end.

Full metal hot ends


The well known E3D and Prometheus hot ends:
http://www.dta-labs.com/products/prometheus-hot-end-v1-1

http://e3d-online.com/E3D-v6

The idea here is that all parts are made of metal.
Pros:
You can reach more than 300°C if you change the thermistor by a thermocouple (normal thermistor can hold 285°C)
Cons:
The price: it’s nearly twice as expensive as a semi-metal hot end.
You can get some issues with PLA as it can expand and get stuck inside the hot end.
Personally i sometimes have the issue with the E3D hot ends, but never got it with Prometheus hot end.
Often it happens when the retraction is too high, the hot plastic is cooling down too fast, and it expands.
You can avoid this issue by retracting only 2 or 3mm of filament.


The extruder is the part of the printer that pushes the plastic into the hot end.
You will find different types/sizes/geometries of extruders.

Each have their pros and cons but the main goal stays the same: push the plastic into the hot end!

They can use different kind of Hobbed bolt to grab the filament and to push it to either the hot end, or through a PTFE tubing.

Greg’s Extruder


This extruder exists for both 3mm and 1.75mm filament diameter.

However you will need to choose the one according to your filament diameter.
Note that what changes is mainly the internal hole size that fits the filament diameter.

They uses what is called Hobbed Bolt. It’s a machined screws with teeth on the flange that allows a good grip on the filament.

Look very closely at this part as the quality of the hobbed bolt is critical to have a proper extrusion!
The original greg’s extruder was purposed to push the plastic directly into the hot end.

  • Pros:

The advantage of this is that you limit the nozzle dripping effect. You can also retract the filament slightly and the retraction effect is immediately taken into account.

  • Cons:

This setup requires the extruder to be on top of the hot end, and therefore you will have the driving motor on top as well. This leads in having a big weight to move and so it reduces the overall speed of the axis where it belongs.

Bowden Extruder

You also have some variant of this extruder that pushes the plastic into a tube. This setup is called Bowden extruder.
The PTFE tubing has the following characteristics and is adapted for each filament diameter:

  • For 3mm filaments:

Inner diameter (ID): 4mm
Outter Diameter (OD): 6mm
Lenght: often 1meter but can vary depending on your setup. The shorter, the better!

  • For 1.75mm filament:

Inner diameter (ID): 2mm
Outter Diameter (OD): 4mm
Lenght: often 1meter but can vary depending on your setup. The shorter, the better!

The Pros:

  • You can achieve very high speed with this setup because you have a limited amount of weight to move.

The Cons:

  • The Hysteresis effect:

As the plastic filament is pushed through the PTFE tube, the tube will get into pressure. When you stop pushing the filament, the residual pressure inside the tube will continue to push the plastic into the tube.

You will therefore have a small dripping/leakage on the nozzle side.
To reduce this effect you will need to retract your filament enough to reduce the pressure inside the PTFE tube to avoid dripping.
This amount of retraction differ a lot from 1 printer to another one, and you might spend some time to figure out the proper amount.
Along with retraction you will have to figure out the retraction speed. The more the better, but your driving motor might be limited to a certain speed/acceleration couple.

Possibles troubles:

You might have different troubles with this kind of setup:

  • Your hot end is too cold
  • Your PTFE tube is too tight
  • Your PTFE tube is too long
  • Your PTFE tube is too curled
  • Your filament quality is bad, and the diameter exceed the Hot end filament hole tolerance
  • Your Hobbed bolt is filled with plastic and cannot push it anymore
  • Your nozzle is stuffed

In all those case here what can happen and what you can do:

  1. Try to increase slightly your hot end temperature, often a few degrees can make the difference.
  2. Try to check your cooling fan, and make sure it doesn’t cool the hot end too much (check your Hot end temperature when this happens)
  3. The driving motor will need to push more!
  4. If you get motor making a lot of noise, you can try to increase current into the motor
  5. If your extruder screws are not tighten enough, you will hear some “click”, in that case try to tighten them a little bit.
  6. If your extruder screws are too tight, your motor might struggle to push the filament and thus make some noise.
  7. Your filament pneumatic connector holding the PTFE tubing might release the PTFE Tube.
    This often means that the filament is either stuck inside the PTFE tube, or that the nozzle is stuffed with something, or your pneumatic connector is broken (some internal teeth might brake when this happens too often).
  8. If your hobbed bolt is filled with plastic, your hobbed bolt will sweep over the plastic, resulting in the motor not pushing the plastic. Clean up your hobbed bolt and try again.

Direct Drive Extruder


Here the goal is to drive directly the filament into the hot end, or the PTFE tube for the bowden version.
The Pros:
Very compact, as you only need a hobbed gear (MK7/MK8/Hobbed shafts, etc…)

The Cons:
You can only use 1.75mm filament, as 3mm filament will require more torque.

Different kind of Direct drive gears


From this nice benchmark :

http://airtripper.com/1676/3d-printer-extruder-filament-drive-gear-review-benchmark/
Here is the result by order of performance:
MK8:

The MK8 Drive Gear provides a good balance of grip and torque to push the filament with force that easily exceeds 4kg.

MK7:

It has excellent grip on the filament and the idler tension is easy to set-up. However, the gears’ large effective diameter may not provide enough torque when nozzle and filament troubles occur. If you’re looking for serious pushing power from a geared stepper motor, the MK7 should be first choice.

Plain Insert drive gear:

Good pushing power. However, the gear can be difficult to set-up without the help of the filament force sensor. If you have good experience with 3d printing and have a well oiled machine, you might get some good performance out of this cheap drive gear.

Raptor drive gear:

As proved with the MK7 Drive Gear, bigger gear teeth don’t mean better grip. However, the Raptor Drive Gear might perform better on a geared extruder where idler tension can be increased, but at the expense of causing more damage to the filament.


For Cartesian printers you will find many sizes of print surface. They are often expressed in inches.
For example:

  • 4″ x 4″ x 4″ (101.6 x 101.6 x 101.6mm) (printrBot Simple)

  • 6″ x 6″ x 6″ (152.4 x 152.4 x 152.mm) (printrBot Simple Metal)
  • 120 x 120 x 115 mm (ultimaker go)

  • 8″ x 8″x8″ (Makerfarm 8″)

  • 230 x 225 x 205mm (Ultimaker 2)

  • 10″ x 10″ x 10″ (printrbot Metal Plus and makerfarm 10″)


  • 12″ x 12″ x 13.5″ (makerfarm 12″)

  • 24″ x 12″ x 12″ (Printrbot Go Large)

You can find some that are the size of a man or a building.

Of course each time the price will vary depending on the printing size.

For delta printers you will also find a wide range of sizes, but Delta printers will be taller than Cartesian printers due to their geometry.


On 3D printer technologies among the most commonly used you will find the following:

  • FFF: Fused Filament Fabrication or FDM (Fused Deposit Modeling) See wiki page

In each case the cost to use the technology will vary. Here is a quick example on the price range:

  • FFF: 250-2500€
  • SLS: mostly professional printers from 4000€ to more than 10000€
  • SLA: from 100$ to 3000$ for DIY models
  • DLP: from 400$ (without the video projector)